
What you need:
Paint (If you are painting)
Tack cloth (If you are painting)
Steel wool (if you are painting)
A mask (recommended especially if spray painting)
3 empty 5 1/2" drive bays
Painters Tape/Masking tape
A razor blade
A pencil
A drill
A 120mm fan (and some mounting hardware)
Your trusty Dremel (or something else for cutting)

Step One: What you need to do is tape the covers from the drive bays the way the would be in the case, make sure you tape good and make them even, or else it'll mess everything else up.

Step Two: Cover the entire front of the shields with what ever kind of tape you are using.

Step Three: Tape the fan onto the front of the covers, once again make sure its nice and tight, if it moves it may mess everything else up.

Step Four: Trace the out line of the fan on the painters tape, then trace the outline of the middle part (the part where the blades go) and mark the screw holes (this can be hard if you have a fan with closed corners if you cant reach the pencil in, you can try putting in a small screw driver instead and making a mark) once done this, you can take the fan off. When your done, it should look something like this: (minus the holes i drilled)

Step Five: Drill the screw whole using what ever size bit matches your mounting hardware, I used a 7/64 drill bit.
Step Six: Using the razer, cut out around the middle circular part, then peel back the rest. mine looked like this:

Step Seven: Paint (if you want) first, rub everything with the steel wool for a while, to get it smooth. Next, wipe it down with the tack cloth to get all the dust off. Next, paint. when it drys, you can peel off the painters tape, but leave it on if you didn't paint (you may want to look at bubba's guides to learn about this) here's mine after painting (i suck at spray painting)

Step Eight: Dremel out the hole in the middle. It will be a lot easier if you separate the drives now, but don't peel off the painters tape in the middle if you didn't paint! If you do you wont know where to cut! If you want, you can either sand it down, or if you want it to look cool, put some automotive trim around it. I left mine bare for now.

Step Nine: Make sure you have the shields exactly aligned, then glue them together using what ever you want. Next mount the fan. (i decided to not bother with the middle little edges, because as you will see in the last pic they dont even show. i wish i had realized this earlier, i wouldnt of had to paint
Step Ten: Stick it in your rig! You're all done. Just be careful not to stick your finger in. if you want you can put a shield or something, but i didn't bother.

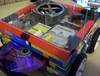
as you can see, the drive shields i whored from other cases were just a little to narrow to fit on the front of my case,(which in this case is a good thing) so they were pushed back into the actual drive bays. luckily for me, my existing shields (which have mesh and dust filters, which is why this was a good thing) can go infront. it makes it look a lot nicer.


