Intel D975XBX 'Bad Axe' Motherboard Debug Mod Guide

Discussion about Intel CPU Motherboards
Post Reply
User avatar
Apoptosis
Site Admin
Site Admin
Posts: 33941
Joined: Sun Oct 05, 2003 8:45 pm
Location: St. Louis, Missouri
Contact:

Intel D975XBX 'Bad Axe' Motherboard Debug Mod Guide

Post by Apoptosis »

with the Intel D975XBX motherboard ($235) easily performing better than any Intel desktop motherboard produced it's no wonder many enthusiasts are picking up reference Intel boards for the first time ever. While using a processor like the Intel Core 2 Duo Extreme X6800 gives you a fully unlocked BIOS many users with processors like the Intel Core 2 Duo E6300 are finding a BIOS with no chipset voltage options, Vcore options, strap options, and 20% limited overclocking. While Intel did this on purpose there is a quick and easy way to get around it. When Intel orginally developed the board they had a debug jumper on the board, but later removed it on recent revisions. In debug mode the BIOS made all features available so the system could be setup correctly. This mod will re-enable this feature allowing you to undervolt or overvolt the processor and chipset for under $10.

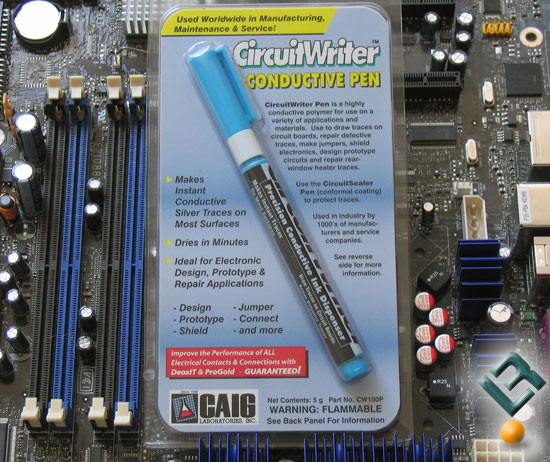
The first step is to find a conductive pen. We tried connecting the traces with an old fashioned pencil, but it failed to do the trick on a number of our Bad Axe motherboards. We then went up to the local Radio Shack here in St. Louis and picked up a couple conductive pens for $6.97 on clearance (Cheaper at RadioShack online).

The $7 Conductive Pen We Used:
Image

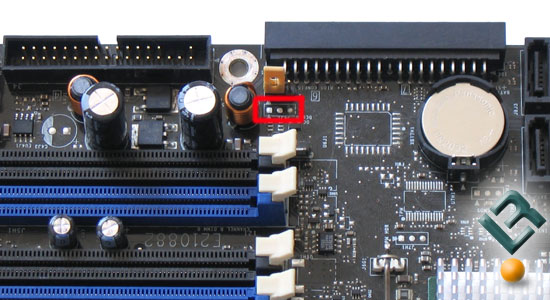
With the Conductive Pen in hand find the the 3-pin header called "BIOS CONFIG" that we all love to use BIOS flashing and "Oh **** I Screwed Up" mode. Directly below (or above depending on how you look at it) you will find a silk-screen location labeled 'OC DEBUG'. The two circles that do not have the triangle pointing to them need to be connected. The OC Debug location is shown in the red box.

How it should look from Intel:
Image

After the area is free of dust or dirt take your conductive pen and connect the two 'dots' to complete the mod.

The Mod Completed:
Image

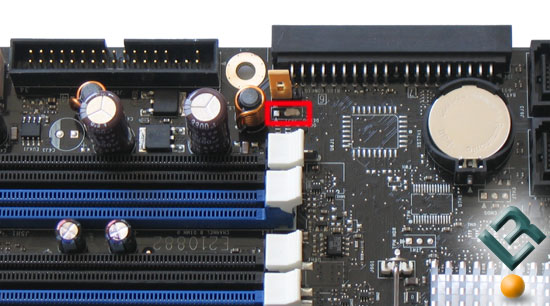
It doesn't look pretty, but it gets the job done. The two points are now connected and the board thinks it is in debug mode. Now hit F2 when the system is rebooted and you should have all the BIOS options available that users that can afford the X6800 have for just completing this simple debug mod.

The mod takes about 15 minutes to complete and 10 minutes of that are letting the conductive ink dry. This does void the Intel warranty, but can be removed by a fingernail so it can be undone.

Cheers and enjoy the new 50% overclock and voltage options on your Conroe processor!
User avatar
injun
Legit User
Legit User
Posts: 17
Joined: Sun Aug 06, 2006 8:21 pm

Post by injun »

Very cool but is this modified board now going to give you more OC options and range than the ASUS P5W DH Deluxe? If so I will be bummed. :cry: :)

By the way do you have any of the comparable numbers and options from standard to modified? That would be cool to see the differences. 8)
Post Reply