Page 1 of 2
How To: Paint Dipping
Posted: Mon Feb 19, 2007 5:31 pm
by bubba
Ok, you need to paint a complex part, and you don't want to rattle can the part due to over spray. Well you have an option available to you.
Stuff needed:
- Bucket big enough to hold the part completely.
- Oil base paint in the color you want.

Step 1:
Fill the bucket with enough water to cover the part with out touching the bottom of the bucket. Then pour the paint in slowly. what do you know paint floats! pour enough in to cover the surface of the water.
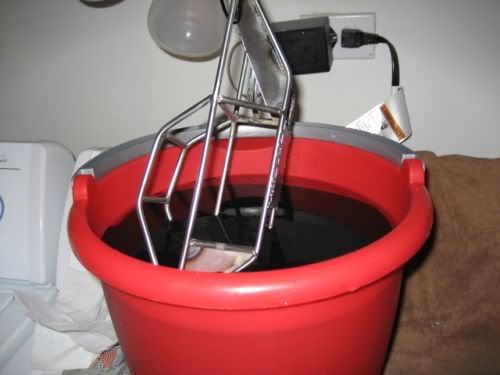
Step 2:
hang your part on some thin wire, This will also be used to hang the part to dry, so make it so you can hold the part for dipping and hang drying.
Lower the part into the bucket, since the paint hits the part first, the part is covered before it hits the water, thus water wont mess up the paint or make the part rust.
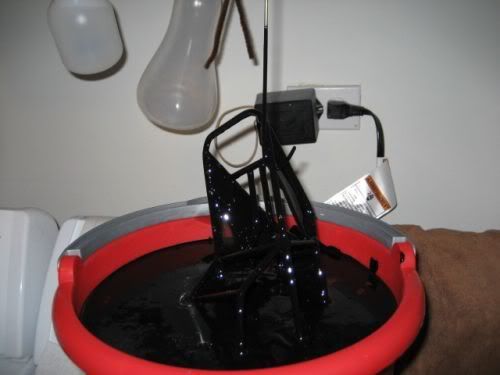
Step3:
Pull the part out slowly.

Step4:
Hang dry.
You could spend the time to skim the paint back off the water but its cheap compared to the time it would take to salvage it.
Image credit goes to jetboat on rccrawler.com, I just elaborated a little on his brief how to, it works rather well. This is a technic that is used in an industrial setting prior to powder coating.
Posted: Mon Feb 19, 2007 5:42 pm
by bigblockmatt
wow, thats pretty good. thanks for the tip.
Posted: Mon Feb 19, 2007 9:59 pm
by The Black Pumpkin
That's an awesome idea, would cut down time on painting my mom's drive cages a lot!
The virtual cookie for you!

Posted: Mon Feb 19, 2007 10:03 pm
by Apoptosis
damn... i just learned something...
Thanks for sharing Bubba!
Posted: Mon Feb 19, 2007 10:11 pm
by dgood
sweet I like it, but can I ask what it was you were painting in those photos? if only I could paint all of my computer components and not have them get screwed up lol.
Posted: Mon Feb 19, 2007 10:48 pm
by The Black Pumpkin
Another question. Does the paint make drippy run marks down when you take it out of the water/paint?
Posted: Mon Feb 19, 2007 11:05 pm
by camaroguy1998
Thats a custom built RC Truck or Car frame dgood!
Bubba, thats one excellent piece of info!
Thanx for sharin' Bubba!
Posted: Mon Feb 19, 2007 11:07 pm
by dgood
I thought it was a frame to a small car of some type but I just thought i'd ask. Its pretty sweet.
Posted: Tue Feb 20, 2007 1:04 am
by snowking03
Yeah, I'm a little leery of this, I'd like to see some close up pictures to make sure that it isn't runny or drippy or anything, because I think the paint would pool up at the bottom end of the part, and that's no good for anything that will be visible.
Posted: Tue Feb 20, 2007 6:02 am
by bubba
The Black Pumpkin wrote:Another question. Does the paint make drippy run marks down when you take it out of the water/paint?
I tried it with a bar, didn't get that little bubble on the end like when you dip plastic. I went slow, I mean sllooowww pulling it out, that way the excess runs off as you pull it out.
Like with any other paint technic, I would practice on something first.
dgood wrote:I thought it was a frame to a small car of some type but I just thought i'd ask. Its pretty sweet.
Yup it's a roll cage for an radio controlled rock crawler.
Posted: Tue Feb 20, 2007 7:14 am
by KnightRid
Nice!!! This will be VERY useful!
Mike
now if I could get patterns for each part in a case, I would be set

Posted: Tue Feb 20, 2007 8:05 am
by bubba
Posted: Tue Feb 20, 2007 11:30 am
by Bio-Hazard
I'm going to have to try this sometime as I can't spray paint worth a damn................

I've seen this done at car factories with full sized chassies, but never on the external surfaces.
Thanks for the info.
Posted: Tue Feb 20, 2007 1:28 pm
by stev
This method will work on plastic as well if the sureface is prepared ahead of time. In most cases, the plastic sufrace only need to be roughed with fine sandpaper.
If you want more of a color selection and some spetacular effects, try the easy techniques found here ...
http://www.yoyoing.com/wildjimbo/wjbmi
Of course, apply bubba's water and oil based paint method to avoid any additional prep or finish work.
Bio mentioned paint dipping large metal parts too.
http://www.eisenmann.de/EN/download/Dip_Painting.pdf
How to do plastic computer panels ...
http://www.modthebox.com/paintguide.shtml
Posted: Tue Feb 20, 2007 2:05 pm
by Bio-Hazard
Stev, you always seem to have a ton of info on just about every subject.................
Thanks for the links.......

Posted: Tue Feb 20, 2007 2:41 pm
by odie2190
thats amazing . ima go try that with my motherboard!

Posted: Mon Apr 23, 2007 6:27 am
by id86
odie2190 wrote:thats amazing . ima go try that with my motherboard!
really? is it possible? i never know that motherboard can be paint
just my 2 cents
Posted: Tue Apr 24, 2007 11:41 am
by tomato
Hmmmm... interesting procedure... I might have to try that out sometime as well. My painting skills leave much to be desired

So, how slow is slow when you're lifting the piece out from the paint? To avoid any runniness/marks, I would think that you would have to pull it up verrrrry slowly...
Posted: Wed Apr 25, 2007 5:16 am
by id86
tomato wrote:Hmmmm... interesting procedure... I might have to try that out sometime as well. My painting skills leave much to be desired
So, how slow is slow when you're lifting the piece out from the paint? To avoid any runniness/marks, I would think that you would have to pull it up verrrrry slowly...
yeah..i think very very slow like no movements seem to be happen
Posted: Wed Apr 25, 2007 5:39 am
by bubba
not slow as a snail, more like a turtle.
remember, as with any new technic you try, practice on a scrap part first find the 'sweet spot' for you.