Project - CUBErt

Discuss cases, PSUs, and various cooling techniques in here.
User avatar
bubba
Staff Writer
Staff Writer
Posts: 4765
Joined: Sun May 01, 2005 10:24 am
Location: STL

Post by bubba »

Apoptosis wrote:Oh his diagram even shows his CPU temp as 30C... hehe
LOL hope on my part :lol:
Pengwin wrote:only 92mm's?? go w/ 120
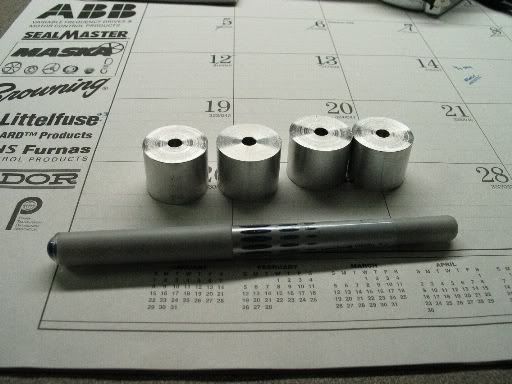
why only 92's well, the 120's wont fit. I will have 3 92's on the front they will push 37cfm each at 26db. I'm not sure if I will have fans in the back or not. I may just install a screen and let it exit on its own. If I run fans in the back there will be 4 60mm fans that will push 20cfm each at 27db all run through a fan controler I should beable to keep things cool when I want and quite when I want.


of course its all theroy, I might fry an egg on the case who knows, I'm wing'n it here :)
User avatar
Apoptosis
Site Admin
Site Admin
Posts: 33941
Joined: Sun Oct 05, 2003 8:45 pm
Location: St. Louis, Missouri
Contact:

Post by Apoptosis »

With an open case design I'd worry about the hard drives, the power management on the motherboard and the memory modules. How are you going to cool the processor video card?
User avatar
bubba
Staff Writer
Staff Writer
Posts: 4765
Joined: Sun May 01, 2005 10:24 am
Location: STL

Post by bubba »

Well its not exactly an pure open case, it will still be enclosed on all sides with plexy . For the time being it will be stock coolers though. With the case I have (an old antec) I have the stock Intel heat sink on an 3.6 560J and it idles at 36c and gets up around 55c under load, and that’s just with 2 80mm case fans. Now with this case if I notice I have to max all fans to keep it cool then I will look to aftermarket. I'm hoping with the way I have it the fans it would keep things nice and cool.

On the front, the top fan will blow on/across the video card (XFX 6600), the bottom 2 are lined up with the CPU. If I add the back fans I will have a straight shot front to back some what wind tunnel like effect.

In the future I would like to go passive or water. Passive would be way I'm leaning, it would be cheaper than going water.
User avatar
bubba
Staff Writer
Staff Writer
Posts: 4765
Joined: Sun May 01, 2005 10:24 am
Location: STL

Post by bubba »

got some more work done, cant show pics yet due to some issues with my home PC.

But I have a couple of the hoops made up, the back and bottom panels are cut. So hope to have the outter hoops together here soon.
User avatar
bubba
Staff Writer
Staff Writer
Posts: 4765
Joined: Sun May 01, 2005 10:24 am
Location: STL

Post by bubba »

got some time and material to work on the case, got some more tubing to finish the cage parts, so hope by next week I should have the cage together. My work re-aranged the order some machines were to be made and put a kink in my material gethering LOL, so now that certain machines are being built I'm going to be makeing more progress.

here is a couple pics of the stuff I have made in the last couple days.

Here are the feet for the case, I wanted it to be up off the desk a little. They are made of aluminum. I'm thinking of remaking them with a medium knurl on the outside. The knurl will give it a diamond pattern look.

Image
Image

here is the drive cage all marked up to be altered, everything in red will be cut away.

Image
moon111
Legit Extremist
Legit Extremist
Posts: 290
Joined: Fri Dec 16, 2005 12:33 pm

Post by moon111 »

I came across a case manufacturer's site, who had a very similiar design, except they were showing mid-towers rather then cubes. The skin being used was all mesh and they looked powder-coated. Never seen one retail before. Not sure if they were ever actually produced. The tubing size looks the same though. Think this is an excellent concept, can't wait to see the finished project.

As a side note, RC cars have some excellent paint products for modding cases.
User avatar
bubba
Staff Writer
Staff Writer
Posts: 4765
Joined: Sun May 01, 2005 10:24 am
Location: STL

Post by bubba »

moon111 wrote: As a side note, RC cars have some excellent paint products for modding cases.
yup, I used to airbrush car bodies for 1/10th scale carpet racers, I used to race 1/8th scale buggies. The paint I'm planning on using is the same for the RC boddies, its call fastcolor and its made by a company called parma. It can be picked up at almost any hobby shop.

glad you like the case :)
moon111
Legit Extremist
Legit Extremist
Posts: 290
Joined: Fri Dec 16, 2005 12:33 pm

Post by moon111 »

I was talking to someone from Spazstix (RC model paint), about doing a review for tech-mods.net (site closed). He showed me an awesome mouse-pad he put together.

Image

Was really excited about their chrome paint. Changing color paint is also cool. I was particularly fond of the Holographic paint, which was available in an aerosol can.

Image

I'd love to try my hand at air-brushing. Have a compressor...maybe too big? Hate spending money just to find I don't like something.

http://www.spazstix.com

I appologize for getting off topic. Can't wait to see the finished product.
User avatar
bubba
Staff Writer
Staff Writer
Posts: 4765
Joined: Sun May 01, 2005 10:24 am
Location: STL

Post by bubba »

Not completely off topic, I will be painting the case sides LOL

I llike the fascolor just for the fact that its easy to get ahold of, the spazstix I would have to order.

as for your compressor, all you would need is a regulator to regulate the PSI down to 15-20PSI, also (if you dont have one already) a water trap to collect the water the can build up in the air line and tank.
User avatar
HONkUS
Legit Extremist
Legit Extremist
Posts: 1054
Joined: Wed Jun 07, 2006 2:42 pm
Location: Fort Worth, Texas!
Contact:

Post by HONkUS »

Just out of curiosity what are the advantages to using RC Car paint as opposed to Automotive paint?
User avatar
bubba
Staff Writer
Staff Writer
Posts: 4765
Joined: Sun May 01, 2005 10:24 am
Location: STL

Post by bubba »

well an rc car body is made of lexan around 0.03" to 0.06" thick. Well the body can twist and flex, also the body get beat to hell in a race.

To hold up to the twisting and the beating the cars are painted on the inside of the body with a speacial paint for lexan that will bond with the plastic and (the most inportant part) the paint will flex with the body with out cracking.

Down side to painting the car this way is that you have to do it in reverse order that you paint the outside of a car. so graphics first then the base color for the car.

Now, as for CUBErt I am using lexan on the sides of the case. I will paint the inside sruface. this will leave the outside with the high gloss look and wont scratch the paint. If the side does get scratched I can buff it out with out worry of messing up a clear coat or having to re-color sand a spot.

Now this ONLY works for on the inside, if you painted it on the outside it would look as if you painted it with chalk almost.


Here is a couple of shots of cars, shows the gloss effect you can get.

Image

Image
User avatar
Apoptosis
Site Admin
Site Admin
Posts: 33941
Joined: Sun Oct 05, 2003 8:45 pm
Location: St. Louis, Missouri
Contact:

Post by Apoptosis »

I never knew the inside of those were painted... WOW :shock:
User avatar
bubba
Staff Writer
Staff Writer
Posts: 4765
Joined: Sun May 01, 2005 10:24 am
Location: STL

Post by bubba »

yup, and there are some that are just flat out unreal.

This is my fav at the moment, not to bad for a truck that is only 14 inches long.

Image
User avatar
HONkUS
Legit Extremist
Legit Extremist
Posts: 1054
Joined: Wed Jun 07, 2006 2:42 pm
Location: Fort Worth, Texas!
Contact:

Post by HONkUS »

Wow that is really cool ill have to show this to my big bro he builds nitro-methane RC cars but all his body's are beat to ****, he doesnt drive them with much care lol.
User avatar
bubba
Staff Writer
Staff Writer
Posts: 4765
Joined: Sun May 01, 2005 10:24 am
Location: STL

Post by bubba »

yeah! progress.

got some of the outer frame tacked to gether, will get all the finish brazing done once I have it all squared up.

for the update pics I stuffed the 5.25 drive cage in (held in with binder clips).


Image
Image
User avatar
Apoptosis
Site Admin
Site Admin
Posts: 33941
Joined: Sun Oct 05, 2003 8:45 pm
Location: St. Louis, Missouri
Contact:

Post by Apoptosis »

nice... what's the next step now that the outside is done? Also how strong is it in the middle of the tube? Does it feel like it will bend/kink or does it feel good to go?
User avatar
bubba
Staff Writer
Staff Writer
Posts: 4765
Joined: Sun May 01, 2005 10:24 am
Location: STL

Post by bubba »

the next step will be to get the outer tubes (as it sets in the pics above) squared up and brazed. Once brazed they will stiffen each other up alot. As it sets now I would not set anything heavier than 50 spindle of cds on it. Once brazed it could hold the STL yellow pages easy.

Then I will start to lay in the inner tube work... like an x brace for a roll cage on a car. The inner tubes will destribute the wieght to the outer tubes, as well as take out the abillity to twist. It will also provide mounting places for the mobo tray and drive cages and such.

I started to look at the amount of wieght that can be put into a case and I revised my design to put in a couple more braces, figured it wouldn't hurt LOL.
User avatar
bubba
Staff Writer
Staff Writer
Posts: 4765
Joined: Sun May 01, 2005 10:24 am
Location: STL

Post by bubba »

OK, small set back. I was working on the cage and think I kept woring one spot to long, well... long story short, its warped. suck part is I was 95% done with putting in the stiffeners. so its going to be a pain to straighten. I hope I can do it with out cutting it apart.

so at the moment I'm a bum'n.

So for future reference boy and girls, thin metal + high heat + to long in one spot = warping :evil:
User avatar
bubba
Staff Writer
Staff Writer
Posts: 4765
Joined: Sun May 01, 2005 10:24 am
Location: STL

Post by bubba »

well I was aslbe to get it somewhat beat back into shape. :? still not where I would like it, going to work on it somemore this weekend.

Here is a snap shot of it on the stainless :mrgreen: base plate I started making today.

Image

as I was workingon getting the warping un-done, I was looking over the whole idea. I'm thinking of changing how the inside of the cube will be laid out, I'm not sure yet, but it may look differant come monday :)
User avatar
Apoptosis
Site Admin
Site Admin
Posts: 33941
Joined: Sun Oct 05, 2003 8:45 pm
Location: St. Louis, Missouri
Contact:

Post by Apoptosis »

what are you cutting the stainless with?
Post Reply